
Overview
The Automated Screening Application has two sides. The applicant portal and the administrator’s site. This page is where we will go over all of the pieces of the administrator site and how to use them.
Getting Started
The first step is to request an account. We currently do not have an automated registration process for this application. The steps to get started are simple though, simply fill out the form below.
Once you receive a password and confirmation email you can log in at:
http://screen.rb-sns.com:8080/screeningadmin/login
When you log in, you will see the Company listing page. In most cases, your account will be tied to only one company so select the one row to go to the company homepage.
Add Account Users
Every account needs to have an admin user (we will provide your login info) and we recommend you also create non-admin accounts for your team. Adding an account is accomplished on the Company homepage.
- Click the “New Admin” button in the Administrators section.
- Enter a username and password
- Grant the desired permissions by selecting the checkboxes. Make sure you click on the active checkbox to enable this new account
- Select which company the user is to be assigned. There may only be one option available.
- Click on the Save button
- Add more users as desired
User Permissions
Here is an overview of the permissions available to an administrative user.
Reviewer – Essentially a read-only permission. It grants the ability to view jobs and applicants
Admin Company – Provides access to change company related information including the company interview. It should be a highly restricted permission and not given out freely.
Can Deep Screen – Allow user to enter and score an application on the deep screen information
Can Phone Screen – Allow user to provide feedback from a phone screen with an applicant
Admin Jobs – Create a Posting, set questions, and any other tasks related to creating/publishing an open position.
General Navigation
Most of the navigation on the admin site is driven from the Company Home Page. Some of these options are not visible based on user permissions. Here is the complete list of menu options provided.
Jobs Dashboard
This option opens the Jobs Dashboard page. It is a report on the jobs your company has created and current status. It also shows the number of applicants for each position as well as the average tech and matching scores based on all completed tests. Note that applicants may be in the system and not have completed tests. Thus, the entire number of applicants is not related to the average scores.
The Company Interview
One of the first things to do before posting a job is to complete the company interview. This process is required to create your default matching questions. We screen for technical skills, but also look for a match in areas like drive, culture, shared values, and more.
Only a Company Admin can take the interview. These users will see a menu option at the top of the company homepage “Company Interview.” Click on this to be presented with a series of questions. Although there is no “wrong” answer to these the responses will impact how applicants match.
The person taking this should be well versed in the company and its culture. We feel this step is important enough that we are happy to offer some consultation on it. Send us an email to schedule a walk-through for your company. We find that thirty minutes spent assessing your business adds to the match and retention rate of employees. When in doubt, choose the most applicable answer.
Creating a Job/Posting
The primary goal of this site is to connect applicants to jobs, so this is a critical part of the features. Start the job creation process from the Company Home screen. Click the “New Job” button under Job List section header. It takes you to the Job View page. Below is a screenshot of a newly created job that has been filled out.
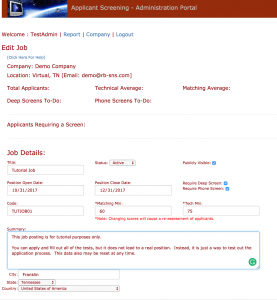
The top information comes from your company and statistics about the job. For a new job, focus on the Job Details section and below. Note that you can click on the “Click here for help” link to find out more about creating a job.
Title – This is a short display for the job in lists. Try to keep it short, but meaningful such as, “Senior .NET Developer with Financial Sector Experience.”
Status – This starts as Pending which is not available. Once you have all the data in place, set it to active.
Publicly Visible – You can have jobs that any applicant can see or you can make a job application available only by entering a code.
Position Open and Close Dates – These define when applicants can apply for the position. A publicly visible job is not available outside of the open and close dates.
Requires Deep, Phone screen – Check these if you want your application process to include deep and phone screen steps. Selecting these will make those activities part of the process and make the related tabs available.
Code – This is the code to provide applicants so they can apply for a job that is not publicly visible.
Matching Min and Tech Min – These are the minimum scores for applicants to be considered. If you set the matching Min to 75, that means an application must get 75% or better on the match portion of the assessment to be further considered.
Summary – This is your detailed job description. Applicants will see this and decide whether to apply based on it. If you have a job that is not publicly visible, you may have covered this on your site where you provided the code.
City, State, Country – This is the location of the job. If it is remote, then enter “Remote” as the city.
Note: When you save a new job there will be a bunch of default questions assigned to the position based on the Company Interview answers. If you have not gone through the interview, then none of those will be added to the job.
Adding Questions to the Job
The default questions added to the job are to assess an applicant match for the company. Now you need to add technical and job matching questions as well as deep screen (long answer) ones that you want to pose.
Question Level – We have categorized questions into those that would likely be posed to different applicant levels. For example, a new graduate is not going to face the same questions as a seasoned veteran. Select a level and a tech or matching category to add related questions. Note that some combinations may not have any questions. In these cases, feel free to create your own or contact us for some suggestions.
Deep Screen Questions – These are added one at a time. You can see the question in the selection drop down. Once the desired item is found, click the Add Deep question button to add it to the list of questions.
Deleting Questions – If you don’t like a question, you can click on the row to edit it or click the delete link to remove it from the job.
Note: The number of questions added for an action are noted in a message at the top of the screen. Also, if you try to add ones that already exist for the job, they will not be added a second time.
Screening Candidates – Round 1
The first step in screening candidates is to see how they did on the tech and matching questions. If they passed your threshold scores, then they will be automatically pushed to the next step. If not, then you can manually allow them to proceed to the next phase.
In any case, you may want to review how they answered questions and got the score they received. This task is performed in the admin application. Log in, go to your company page and select the job you want to work. The bottom part of the page has a tab for applicants, questions, and recommendation. Click on the Applicants tab to see a list of applicants for the job. It will provide a summary of their scores
Screening Candidates – Round 2
The second step is screening is to review the answers to the long-form questions. These essay answers typically provide a lot of details about the applicant and their experience. Of course, they need to be worded correctly and lead to long-form answers.
This phase is completed by clicking on the “Deep Screen” tab and entering notes in each of the listed sections. It is important to capture these various categories of thoughts about an applicant to ensure they are vetted and not just rubber-stamped through. The more details provided here, the easier it is for the final decision to be made. When a candidate “passes” this screening step then click on the “Recommend For Position” checkbox to keep them for the next phase.
Note that deep and phone screens may or may not be required for a position. If a deep screen is not required, then the candidates that are moved forward will be placed in the final selection group. On the other hand, applicants can be ignored in later screening phases by not recommending them.
Screening Candidates – Phone Screens
In some cases, it is best to have a call to screen a candidate. This is done on the phone screen tab of the applicant page. The start and end time fields have a little clock button you can click to paste in a time stamp. This makes it easy to track time on a call. Click the button under start when the call starts and the one under end time when it completes.
We highly recommend you walk through the sections in the phone screen tab and assess the candidate for these high-level areas of compatibility. A complete phone screen will have useful feedback in each of these areas to help select the best candidate and support that decision.
The Moment of Truth
Each applicant page has a link to select them as a primary, secondary, or tertiary recommendation. Once the evaluation process is complete this is where the (up to) top three recommendations are made. There is also a recommendation tab on the job screen to enter an overall summary of the process, recommendations, and any other notes for the end report.
Once the recommendations are complete, the Report link at the top of the job screen is clicked to see an overall report for the job. This can be printed and sent to the key decision makers.